
i'm a maker.
it's true.
however, this holiday season i am also:
a newbie etsy shop owner with christmas orders
a mover of house some 1700 kilometres up the coast
the partner of a very special person turning a very special 40, and
an interstate-travelling solo parent for the week prior to and after c-day
so i'm making in the wee hours to fill orders - something new to me and definitely worth another post when the experience is complete - and to sneak in a handmade with SO MUCH LOVE gift for my very special person without him seeing. soon my supplies for making will be packed and ready to move from one home to the next, my very special gift will be gifted and i will head south with the small folk to celebrate the festive season with family and friends.
hence, in this moment*
my sisters will get a spoonful
my parents will get cafe au lait
my little nieces and nephews will wear these
and the bigger ones will have quite a year
and the in laws will buy goats
*open, and likely, to change with each setting sun
and your list?
please do share.
Friday, November 26, 2010
Wednesday, November 17, 2010
on being treasured

i opened my etsy shop a little while ago. listed some of the pieces i've made over the past few months and felt wonderful that they were out there for folk to browse and buy. then i went to bed.
the next morning i awoke and had a note letting me know that one of my pieces had been 'treasured' - included in another etsy members' treasury. a treasury is a thematic list of favorites that etsy members put together for their own viewing pleasure and for publishing on the etsy site.
it was a warming, bouyant feeling. a little wee hee kinda feeling. treasured. shucks. i knew these pieces were beautiful. but to know that others did too? shucks.
two more treasures have been 'treasured' since then. the feeling is still warming and bouyant and i treasure that fact that folk are looking. and liking.
you, too, can put your own 'treasury' together at etsy. i'm currently putting one together for my lovely lover's upcoming birthday. leather satchels and chai kits. go on, make one!
Friday, November 12, 2010
local craft fair

Thursday, November 4, 2010
wee felt treasure bag tutorial
we're currently shacking up in a beachside resort while we look for more permanent digs. as well as it's fair share of 'weekenders', there are some other 'residents' here. our small folk have become part of a little posse of small folk who live here. yesterday we were invited to a birthday party for one of aforementioned posse. a wee treasure bag was stitched this morning then passed over to the smalls to fill. they chose four found treasures, "one from each of us, mama". simple. happy. from us to you.
these treasure bags are easy to make. here's how i go about it.

time needed
a cup of tea and a peppermint ball
materials
a small piece of wool felt
a glass
a pencil
embroidery floss
sewing needle
scissors
firstly
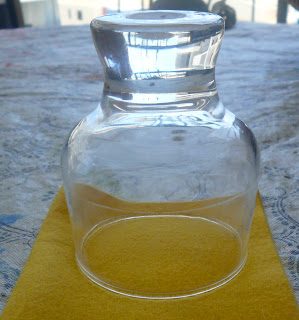
choose a glass about the size of the treasure bag you will be making. fold your felt piece over and place the glass on top. use your pencil and draw around the bottom half of the glass, leaving the top of the circle open.

then,
draw a line from one side to the other. i like to make mine a wave, but you can make it any shape you like.

then,
cut them out. you need two pieces.
 then,
then,
choose your floss. take three of the six strands and thread your needle. start with an anchoring knot on the inside of one of the pieces.
 then,
then,
stitch your pieces together. blanket stitch your way around the bag. start and finish your blanket stitch about 1 cm from the top on each side. nice clear blanket stitch guide here
 then,
then,
stitch some handles. choose a different color floss, take three strands and thread your needle but do not knot (te he!) the end of your floss. stitch a simple running stitch across one side of the bag and then the other. once you have stitched all the way around your bag, knot the ends of the floss together to form one handle.


 then,
then,
thread your needle with the other three strands of floss and repeat the running stitch handle, but start your stitching on the other side of the bag. you'll then have two handles, one on either side of your bag.


then,
fill with treasures, pull the handles so the opening gathers, and you are done.


simple. happy.
these treasure bags are easy to make. here's how i go about it.

time needed
a cup of tea and a peppermint ball
materials
a small piece of wool felt
a glass
a pencil
embroidery floss
sewing needle
scissors
firstly
choose a glass about the size of the treasure bag you will be making. fold your felt piece over and place the glass on top. use your pencil and draw around the bottom half of the glass, leaving the top of the circle open.


then,
draw a line from one side to the other. i like to make mine a wave, but you can make it any shape you like.

then,
cut them out. you need two pieces.

choose your floss. take three of the six strands and thread your needle. start with an anchoring knot on the inside of one of the pieces.

stitch your pieces together. blanket stitch your way around the bag. start and finish your blanket stitch about 1 cm from the top on each side. nice clear blanket stitch guide here

stitch some handles. choose a different color floss, take three strands and thread your needle but do not knot (te he!) the end of your floss. stitch a simple running stitch across one side of the bag and then the other. once you have stitched all the way around your bag, knot the ends of the floss together to form one handle.


thread your needle with the other three strands of floss and repeat the running stitch handle, but start your stitching on the other side of the bag. you'll then have two handles, one on either side of your bag.


then,
fill with treasures, pull the handles so the opening gathers, and you are done.


simple. happy.
Subscribe to:
Posts (Atom)
